Table of content
Filter slider
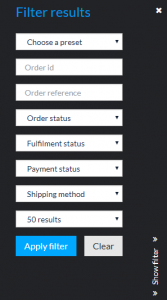
Most screens have options for filtering data. Where filters are available, the ‘filter slider’ is available on the menu bar. Click the filter slider to open it. Enter desired values, select from dropdowns and date pickers, then click ‘apply filter’.

The screen is then filtered and the filter slider closed. Once the filter slider is closed, you can tell that filters are active because the filter skyscraper becomes blue

To clear a filter, open the filter slider and click on ‘clear’.
Filter Presets
Warewolf has a ‘presets’ feature in most screens that allows you to save your favourite filter combinations. Next time you use the screen, simply select from a list of saved presets. This feature saves time and avoids multiple filter selection mistakes.
Creating filter presets
Let’s follow an example in the orders screen. From the main menu select ‘orders’. The screen open showing no results. Next, click the filter slider to open the filter slider as described above.
Next set the fulfilment status to ‘not fulfilled’. A new button appears at the bottom of the list of filters called ‘save as new preset’.
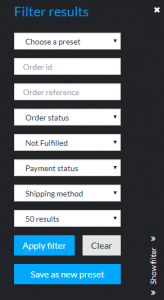
Click the ‘save as new preset’ button. Then enter a name for your new preset in the box that says ‘enter a name to create a new preset’. Say, ‘Orders to fulfil’. Then click ‘filter and save as new preset’. Warewolf runs the preset and delivers the results you asked for.
If you open the filter slider now, Warewolf will show you the preset that you just created. Now let’s say you are working in the goods out notes screen and now want to fulfil some more orders. Click on orders then open the filter slider. From the ‘choose a preset’ dropdown, select ‘orders to fulfil’.
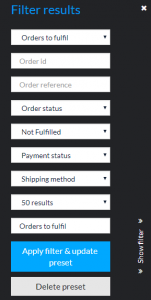
At this point you may delete this preset using the delete button. Alternatively, you can run the preset by clicking ‘apply filter & update preset’, Warewolf will fetch your results.
Now, let’s say that you want to change the preset because your business has a rule that orders can only be fulfilled when the payment status is ‘paid’. Change the payment status to ‘paid’ (or a similar status in your organisation.
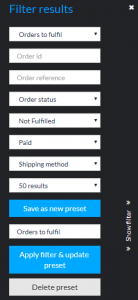
This time, Warewolf adds a new button ‘save as new preset’. In the box just below that button, Warewolf shows the current filter name ‘orders to fulfil’. You now have two choices.
Click ‘apply filter & update preset’ to keep the current preset name BUT now with the filters ‘not fulfilled’ AND ‘paid’. Next time you load this preset you will have both filters active.
Alternatively, click ‘save as new preset. Warewolf clears the name from the box and asks you to provide a new name for the preset. Enter the name ‘paid orders to fulfil’ and click ‘filter and save as new preset’. Warewolf saves your new preset and fetches your results.
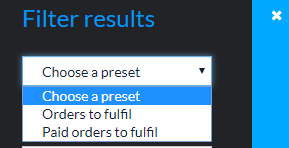
Next time you use the preset feature, you will find ‘paid orders to fulfil’ added to the dropdown.
![]() Presets are especially powerful in the goods out notes (GON) screen where you want to create several GON batches based on a range of sales channel, priority and shipping method criteria.
Presets are especially powerful in the goods out notes (GON) screen where you want to create several GON batches based on a range of sales channel, priority and shipping method criteria.
Last Update: May 14, 2018